External Integrations
Change Data Capture (CDC)
Note
Logical decoding for distributed tables is a preview feature since Citus v11.3.
Differences from single-node PostgreSQL
PostgreSQL provides logical decoding to export events of interest from its write-ahead log (WAL) to other programs or databases. The WAL keeps track of all committed data transactions; it is the authority on all data changes happening on a PostgreSQL instance. By subscribing to a logical replication slot, an application can get real-time notification of the changes.
Consuming change events from a Citus cluster rather than single-node PostgreSQL adds two sets of challenges:
Client subscription complexity. Any logical decoding publication must be created in duplicate across all nodes. An interested application must subscribe to all of them. Furthermore, events within each publication are guaranteed to be emitted in the order they happen in the node, but this guarantee does not hold for events arriving from multiple nodes.
Shard complexity. (Automatically handled by Citus v11.3+ when the citus.enable_change_data_capture (boolean) GUC is enabled.) Citus nodes store shards as physical tables. For example, a distributed table called
foois stored across multiple tables with names such asfoo_102027,foo_102028, etc. The underlying shard names should be translated back to the conceptual name of the distributed table for CDC. Also administrative actions like moving shards between worker nodes generates WAL events, but these spurious events should be hidden from CDC.
If the citus.enable_change_data_capture (boolean) GUC is enabled, Citus automatically handles the first set of issues, normalizing shard names and suppressing events from shard creation and movement. The second set of issues, however, are the client’s responsibility.
Logical replication of distributed tables to PostgreSQL tables
Postgres’ CDC with logical decoding forms the basis of logical replication, which allows you to replicate table changes from one PostgreSQL server to another. As an example, let’s subscribe to changes from a distributed table in a Citus cluster, and populate a regular table in a single-node PostgreSQL server.
First, enable logical decoding on all Citus nodes. In the postgresql.conf file of each of them, configure the WAL and replication slots:
# add to postgresql.conf on all nodes

# include enough information in WAL for logical decoding

wal_level = logical

# we need at least one replication slot, but leave headroom

max_replication_slots = 10

# enable Citus' logical decoding improvements for dist tables

citus.enable_change_data_capture = 'on'
After changing the configuration files, restart the PostgreSQL server in each Citus node.
Create an example distributed table on the coordinator, and a publication to share changes from the table.
-- example distributed table

CREATE TABLE items (
  key TEXT PRIMARY KEY,
  value TEXT
);

SELECT create_distributed_table('items', 'key');

-- citus will propagate to workers, creating publications there too

CREATE PUBLICATION items_pub FOR TABLE items;

-- fill with sample data

INSERT INTO items SELECT generate_series(1,10), 'a value';
Note
Be careful not to create a publication for all tables.
-- don't do this!
CREATE PUBLICATION FOR ALL TABLES;
Creating publications for all tables includes Citus’ own metadata tables, which can cause problems.
Check that the worker nodes have the correct hostname set for the coordinator, and adjust with citus_set_coordinator_host if necessary. Then, create logical replication slots on all nodes by running the following on the coordinator:
-- create replication slots on all nodes, and choose the pgoutput format

SELECT * FROM run_command_on_all_nodes($$
  SELECT pg_create_logical_replication_slot('cdc_slot', 'pgoutput', false)
$$);
Finally, on the single node PostgreSQL server, create the items table, and
set up subscriptions to read rows from all Citus nodes.
-- on the standalone PostgreSQL server

-- match the table structure we have on Citus

CREATE TABLE items (
  key TEXT PRIMARY KEY,
  value TEXT
);

-- subscribe to coordinator

CREATE SUBSCRIPTION subc
  CONNECTION 'dbname=<dbname> host=<coordinator host> user=<username> port=<coordinator port>'
  PUBLICATION items_pub
  WITH (copy_data=true,create_slot=false,slot_name='cdc_slot');

-- subscribe to each worker (assuming there are two workers)

CREATE SUBSCRIPTION subw0
  CONNECTION 'dbname=<dbname> host=<worker1 host> user=<user> port=<worker1 port>'
  PUBLICATION items_pub
  WITH (copy_data=false,create_slot=false,slot_name='cdc_slot');

CREATE SUBSCRIPTION subw1
  CONNECTION 'dbname=<dbname> host=<worker2 host> user=<user> port=<worker2 port>'
  PUBLICATION items_pub
  WITH (copy_data=false,create_slot=false,slot_name='cdc_slot');
Note
The copy_data argument should be set to true on the coordinator
subscription, to copy any existing data to the CDC client. However,
copy_data should be false for worker subscriptions, otherwise it’ll
result in duplicate data in the CDC client and cause replication errors.
Logical decoding caveats
Support for only the pgoutput and wal2json formats, so far. You can currently use these two decoders (if installed). Other decoders will not have the distributed table name normalizing applied to them
Replication slots need to be created separately on each node. While the initial creation is easy with run_command_on_all_nodes, there is still extra work when adding a new node. You need to create a replication slot (or subscription) before rebalancing shards.
Cross-node changes arriving out of order. Changes happening on the same node always arrive in the same order, but since your client will listen to each node separately, there are no guarantees regarding the order of changes happening across different nodes.
Distributed table modification restriction. Using alter_distributed_table will break the replication stream.
No columnar tables. logical decoding does not work with Columnar Storage.
The need for a consumer. When doing logical decoding (with or without Citus), be sure there are subscribers consuming publications, or else the WAL data will accumulate and cause problems for the publishing database.
Ingesting Data from Kafka
Citus can leverage existing Postgres data ingestion tools. For instance, we can use a tool called kafka-sink-pg-json to copy JSON messages from a Kafka topic into a database table. As a demonstration, we’ll create a kafka_test table and ingest data from the test topic with a custom mapping of JSON keys to table columns.
The easiest way to experiment with Kafka is using the Confluent platform, which includes Kafka, Zookeeper, and associated tools whose versions are verified to work together.
# we're using Confluent 2.0 for kafka-sink-pg-json support
curl -L http://packages.confluent.io/archive/2.0/confluent-2.0.0-2.11.7.tar.gz \
  | tar zx

# Now get the jar and conf files for kafka-sink-pg-json
mkdir sink
curl -L https://github.com/justonedb/kafka-sink-pg-json/releases/download/v1.0.2/justone-jafka-sink-pg-json-1.0.zip -o sink.zip
unzip -d sink $_ && rm $_
The download of kafka-sink-pg-json contains some configuration files. We want to connect to the coordinator Citus node, so we must edit the configuration file sink/justone-kafka-sink-pg-json-connector.properties:
# add to sink/justone-kafka-sink-pg-json-connector.properties

# the kafka topic we will use
topics=test

# db connection info
# use your own settings here
db.host=localhost:5432
db.database=postgres
db.username=postgres
db.password=bar

# the schema and table we will use
db.schema=public
db.table=kafka_test

# the JSON keys, and columns to store them
db.json.parse=/@a,/@b
db.columns=a,b
Notice db.columns and db.json.parse. The elements of these lists match up, with the items in db.json.parse specifying where to find values inside incoming JSON objects.
Note
The paths in db.json.parse are written in a language that allows some flexibility in getting values out of JSON. Given the following JSON,
{
  "identity":71293145,
  "location": {
    "latitude":51.5009449,
    "longitude":-2.4773414
  },
  "acceleration":[0.01,0.0,0.0]
}
here are some example paths and what they match:
/@identity- the path to element 71293145./@location/@longitude- the path to element -2.4773414./@acceleration/#0- the path to element 0.01/@location- the path to element{"latitude":51.5009449, "longitude":-2.4773414}
Our own scenario is simple. Our events will be objects like {"a":1, "b":2}. The parser will pull those values into eponymous columns.
Now that the configuration file is set up, it’s time to prepare the database. Connect to the coordinator node with psql and run this:
-- create metadata tables for kafka-sink-pg-json
\i sink/install-justone-kafka-sink-pg-1.0.sql

-- create and distribute target ingestion table
create table kafka_test ( a int, b int );
select create_distributed_table('kafka_test', 'a');
Start the Kafka machinery:
# save some typing
export C=confluent-2.0.0

# start zookeeper
$C/bin/zookeeper-server-start \
  $C/etc/kafka/zookeeper.properties

# start kafka server
$C/bin/kafka-server-start \
  $C/etc/kafka/server.properties

# create the topic we'll be reading/writing
$C/bin/kafka-topics --create --zookeeper localhost:2181   \
                    --replication-factor 1 --partitions 1 \
                    --topic test
Run the ingestion program:
# the jar files for this are in "sink"
export CLASSPATH=$PWD/sink/*

# Watch for new events in topic and insert them
$C/bin/connect-standalone \
  sink/justone-kafka-sink-pg-json-standalone.properties \
  sink/justone-kafka-sink-pg-json-connector.properties
At this point Kafka-Connect is watching the test topic, and will parse events there and insert them into kafka_test. Let’s send an event from the command line.
echo '{"a":42,"b":12}' | \
  $C/bin/kafka-console-producer --broker-list localhost:9092 --topic test
After a small delay the new row will show up in the database.
select * from kafka_test;

┌────┬────┐
│ a  │ b  │
├────┼────┤
│ 42 │ 12 │
└────┴────┘
Caveats
At the time of this writing, kafka-sink-pg-json requires Kafka version 0.9 or earlier.
The kafka-sink-pg-json connector config file does not provide a way to connect with SSL support, so this tool will not work with our Managed Service, which requires secure connections.
A malformed JSON string in the Kafka topic will cause the tool to become stuck. Manual intervention in the topic is required to process more events.
Ingesting Data from Spark
People sometimes use Spark to transform Kafka data, such as by adding computed values. In this section we’ll see how to ingest Spark dataframes into a distributed Citus table.
First let’s start a local Spark cluster. It has several moving parts, so the easiest way is to run the pieces with docker-compose.
wget https://raw.githubusercontent.com/gettyimages/docker-spark/master/docker-compose.yml

# this may require "sudo" depending on the docker daemon configuration
docker-compose up
To do the ingestion into PostgreSQL, we’ll be writing custom Scala code. We’ll use the Scala Build Tool (SBT) to load dependencies and run our code, so download SBT and install it on your machine.
Next create a new directory for our project.
mkdir sparkcitus
Create a file called sparkcitus/build.sbt to tell SBT our project configuration, and add this:
// add this to build.sbt

name := "sparkcitus"
version := "1.0"

scalaVersion := "2.10.4"

resolvers ++= Seq(
  "Maven Central" at "http://central.maven.org/maven2/"
)

libraryDependencies ++= Seq(
  "org.apache.spark" %% "spark-core" % "2.2.1",
  "org.apache.spark" %% "spark-sql"  % "2.2.1",
  "org.postgresql"   %  "postgresql" % "42.2.2"
)
Next create a helper Scala class for doing ingestion through JDBC. Add the following to sparkcitus/copy.scala:
import java.io.InputStream
import java.sql.DriverManager
import java.util.Properties

import org.apache.spark.sql.{DataFrame, Row}
import org.postgresql.copy.CopyManager
import org.postgresql.core.BaseConnection

object CopyHelper {

  def rowsToInputStream(rows: Iterator[Row]): InputStream = {
    val bytes: Iterator[Byte] = rows.map { row =>
      (row.toSeq
        .map { v =>
          if (v == null) {
            """\N"""
          } else {
            "\"" + v.toString.replaceAll("\"", "\"\"") + "\""
          }
        }
        .mkString("\t") + "\n").getBytes
    }.flatten

    new InputStream {
      override def read(): Int =
        if (bytes.hasNext) {
          bytes.next & 0xff // make the signed byte an unsigned int
        } else {
          -1
        }
    }
  }

  def copyIn(url: String, df: DataFrame, table: String):Unit = {
    var cols = df.columns.mkString(",")

    df.foreachPartition { rows =>
      val conn = DriverManager.getConnection(url)
      try {
        val cm = new CopyManager(conn.asInstanceOf[BaseConnection])
        cm.copyIn(
          s"COPY $table ($cols) " + """FROM STDIN WITH (NULL '\N', FORMAT CSV, DELIMITER E'\t')""",
          rowsToInputStream(rows))
        ()
      } finally {
        conn.close()
      }
    }
  }
}
Continuing the setup, save some sample data into people.json. Note the intentional lack of surrounding square brackets. Later we’ll create a Spark dataframe from the data.
{"name":"Tanya Rosenau"   , "age": 24},
{"name":"Rocky Slay"      , "age": 85},
{"name":"Tama Erdmann"    , "age": 48},
{"name":"Jared Olivero"   , "age": 42},
{"name":"Gudrun Shannon"  , "age": 53},
{"name":"Quentin Yoon"    , "age": 32},
{"name":"Yanira Huckstep" , "age": 53},
{"name":"Brendon Wesley"  , "age": 19},
{"name":"Minda Nordeen"   , "age": 79},
{"name":"Katina Woodell"  , "age": 83},
{"name":"Nevada Mckinnon" , "age": 65},
{"name":"Georgine Mcbee"  , "age": 56},
{"name":"Mittie Vanetten" , "age": 17},
{"name":"Lecia Boyett"    , "age": 37},
{"name":"Tobias Mickel"   , "age": 69},
{"name":"Jina Mccook"     , "age": 82},
{"name":"Cassidy Turrell" , "age": 37},
{"name":"Cherly Skalski"  , "age": 29},
{"name":"Reita Bey"       , "age": 69},
{"name":"Keely Symes"     , "age": 34}
Finally, create and distribute a table in Citus:
create table spark_test ( name text, age integer );
select create_distributed_table('spark_test', 'name');
Now we’re ready to hook everything together. Start up sbt:
# run this in the sparkcitus directory

sbt
Once inside sbt, compile the project and then go into the “console” which is a Scala repl that loads our code and dependencies:
sbt:sparkcitus> compile
[success] Total time: 3 s

sbt:sparkcitus> console
[info] Starting scala interpreter...

scala>
Type these Scala commands into the console:
// inside the sbt scala interpreter

import org.apache.spark.sql.SparkSession

// open a session to the Spark cluster
val spark = SparkSession.builder().appName("sparkcitus").config("spark.master", "local").getOrCreate()

// load our sample data into Spark
val df = spark.read.json("people.json")

// this is a simple connection url (it assumes Citus
// is running on localhost:5432), but more complicated
// JDBC urls differ subtly from Postgres urls, see:
// https://jdbc.postgresql.org/documentation/head/connect.html
val url = "jdbc:postgresql://localhost/postgres"

// ingest the data frame using our CopyHelper class
CopyHelper.copyIn(url, df, "spark_test")
This uses the CopyHelper to ingest the ionformation. At this point the data will appear in the distributed table.
Note
Our method of ingesting the dataframe is straightforward but doesn’t protect against Spark errors. Spark guarantees “at least once” semantics, i.e. a read error can cause a subsequent read to encounter previously seen data.
A more complicated, but robust, approach is to use the custom Spark partitioner spark-citus so that partitions match up exactly with Citus shards. This allows running transactions directly on worker nodes which can rollback on read failure. See the presentation linked in that repository for more information.
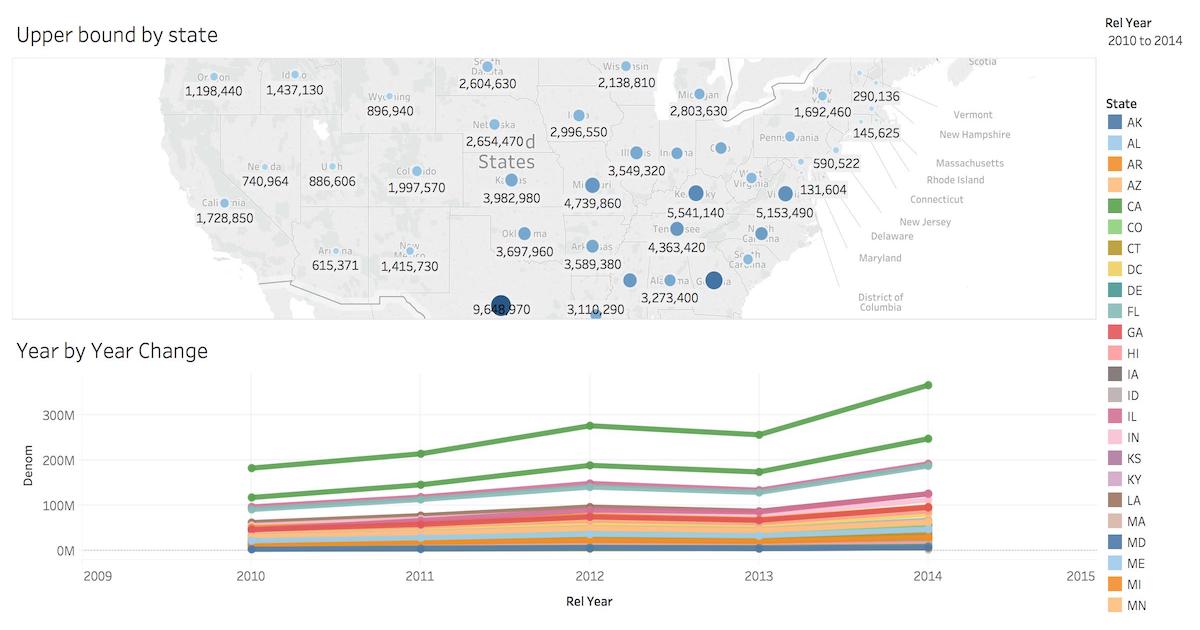
Business Intelligence with Tableau
Tableau is a popular business intelligence and analytics tool for databases. Citus and Tableau provide a seamless experience for performing ad-hoc reporting or analysis.
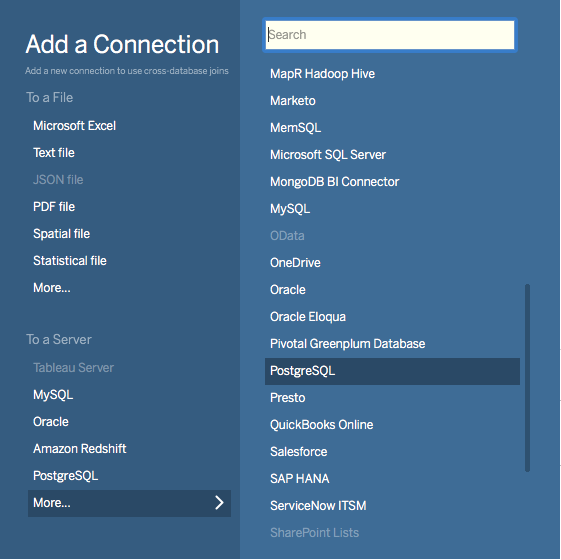
You can now interact with Tableau using the following steps.
Choose PostgreSQL from the “Add a Connection” menu.
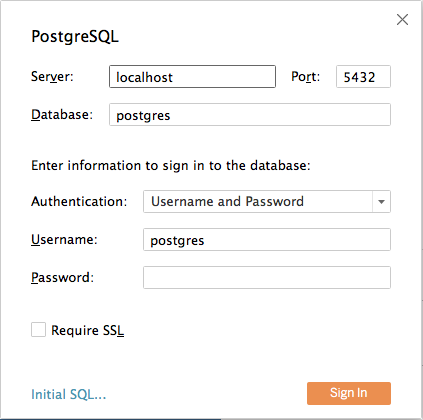
Enter the connection details for the coordinator node of your Citus cluster. (Note if you’re connecting to our Managed Service you must select “Require SSL.”)
Once you connect to Tableau, you will see the tables in your database. You can define your data source by dragging and dropping tables from the “Table” pane. Or, you can run a custom query through “New Custom SQL”.
You can create your own sheets by dragging and dropping dimensions, measures, and filters. You can also create an interactive user interface with Tableau. To do this, Tableau automatically chooses a date range over the data. Citus can compute aggregations over this range in human real-time.