Connection and Security
Applications connect to Citus the same way they would PostgreSQL, using a connection URI. This is a string which includes network and authentication information, and has the form:
postgresql://[user[:password]@][host][:port][/dbname][?param1=value1&...]
The connection string for each Cloud Formation is provided on the Overview tab in Citus Console.
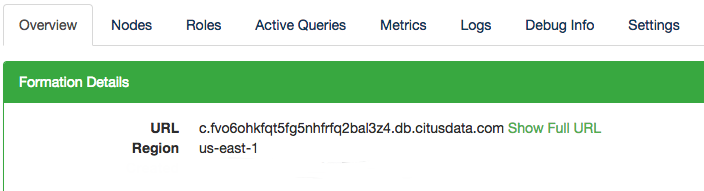
By default the URL displays only the hostname of the connection, but the full URL is available by clicking the “Show Full URL” link.

For security Citus Cloud accepts only SSL connections, which is why the URL contains the ?sslmode=require parameter. To avoid a man-in-the-middle attack, you can also verify that the server certificate is correct. Download the official Citus Cloud certificate and refer to it in connection string parameters:
?sslrootcert=/location/to/citus.crt&sslmode=verify-full
The string may need to be quoted in your shell to preserve the ampersand.
Note
Database clients must support SSL to connect to Citus Cloud. In particular psql needs to be compiled --with-openssl if building PostgreSQL from source.
A coordinator node on Citus Cloud has a hard limit of three hundred simultaneous active connections to limit memory consumption. If more connections are required, change the port in the connection URL from 5432 to 6432. This will connect to PgBouncer rather than directly to the coordinator, allowing up to roughly two thousand simultaneous connections. The coordinator can still only process three hundred at a time, but more can connect and PgBouncer will queue them.
To measure the number of active connections at a given time, run:
SELECT COUNT(*)
  FROM pg_stat_activity
 WHERE state <> 'idle';
Users and Permissions
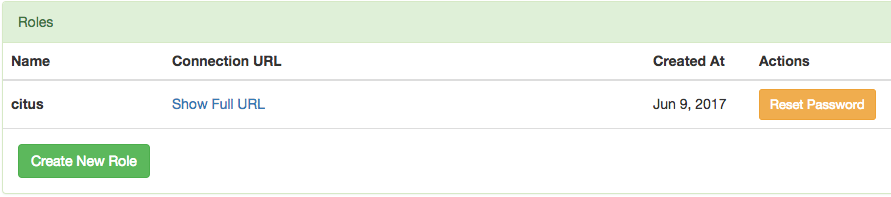
As we saw above, every new Citus Cloud formation includes a user account called citus. This account is great for creating tables and other DDL, but it has too much power for certain applications.
We’ll want to create new roles for specialized purposes. For instance, a user with read-only access is perfect for a web/reporting tool. The Cloud console allows us to create a new user, and will set up a new password automatically. Go to the “Roles” tab and click “Create New Role.”
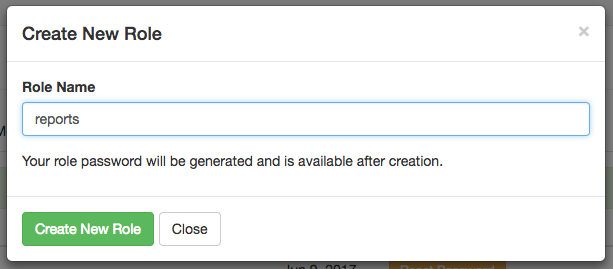
It pops up a dialog where we will fill in the role name, which we can call reports.
After creating the role on a fresh formation, there will be three roles:
┌─[ RECORD 1 ]────────────────────────────────────────────────────────────┐
│ Role name  │ citus                                                      │
│ Attributes │                                                            │
│ Member of  │ {reports}                                                  │
├─[ RECORD 2 ]────────────────────────────────────────────────────────────┤
│ Role name  │ postgres                                                   │
│ Attributes │ Superuser, Create role, Create DB, Replication, Bypass RLS │
│ Member of  │ {}                                                         │
├─[ RECORD 3 ]────────────────────────────────────────────────────────────┤
│ Role name  │ reports                                                    │
│ Attributes │                                                            │
│ Member of  │ {}                                                         │
└────────────┴────────────────────────────────────────────────────────────┘
The new reports role starts with no privileges, except “usage” on the public schema, meaning the ability to get a list of the tables etc inside. We have to specifically grant the role extra permissions to database objects. For instance, to allow read-only access to mytable, connect to Citus as the citus user with the connection string provided in the Cloud console and issue this command:
-- run as the citus user

GRANT SELECT ON mytable TO reports;
You can confirm the privileges by consulting the information schema:
SELECT grantee, privilege_type
  FROM information_schema.role_table_grants
 WHERE table_name = 'mytable';
┌─────────┬────────────────┐
│ grantee │ privilege_type │
├─────────┼────────────────┤
│ citus   │ INSERT         │
│ citus   │ SELECT         │
│ citus   │ UPDATE         │
│ citus   │ DELETE         │
│ citus   │ TRUNCATE       │
│ citus   │ REFERENCES     │
│ citus   │ TRIGGER        │
│ reports │ SELECT         │
└─────────┴────────────────┘
The PostgreSQL documentation has more detailed information about types of privileges you can GRANT on database objects.
Granting Privileges in Bulk
Citus propagates single-table GRANT statements through the entire cluster, making them apply on all worker nodes. However GRANTs that are system-wide (e.g. for all tables in a schema) need to be applied individually to every data node using a Citus helper function.
-- applies to the coordinator node
GRANT SELECT ON ALL TABLES IN SCHEMA public TO reports;

-- make it apply to workers as well
SELECT run_command_on_workers(
  'GRANT SELECT ON ALL TABLES IN SCHEMA public TO reports;'
);
Cloud Security
Encryption
All data within Citus Cloud is encrypted at rest, including data on the instance as well as all backups for disaster recovery. As mentioned in the connection section, we also require that you connect to your database with TLS.
Two-Factor Authentication
We support two factor authentication for all Citus accounts. You can enable it from within your Citus Cloud account. We support Google Authenticator and Authy as two primary apps for setting up your two factor authentication.